Pinterest Fall Foods: Expectations vs. Reality
November 4, 2016
Do you ever find yourself scrolling through Instagram, Twitter, or Facebook and see those fancy pictures on how to make outstanding fall foods? You’re just trying to impress grandma and grandpa and your version just doesn’t turn out the way the picture did? Well, we are here to report if these Pinterest fall foods are all they are cooked up to be. We have made four fall foods inspired by Pinterest and have shown whether or not they turned out as festive as they are shown to be.
Apple Pops – Recipe by Domestically Blissful
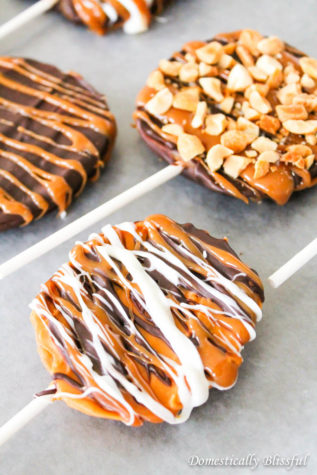
This fall favorite by Domestically Blissful, who you can find on Pinterest, created a very clever twist on the well-known Cake Pop made healthier and in an easy to make alternative, Apple Pops! This recipe needs:
- 1 Apples
- Caramel sauce
- Melting chocolate
- Toppings – optional
- 1 White or wooden lollipop sticks
Directions, taken straight from Pinterest:
- Slice apples into thick slices so the sticks are able to hold the apple up.
- Cover each apple slice in melted chocolate & place on a piece of wax paper to dry. Continue this process until all of your apples are covered in chocolate & have hardened.
- Drizzle the caramel & other toppings on top of your apple slices.
- Let harden & enjoy!
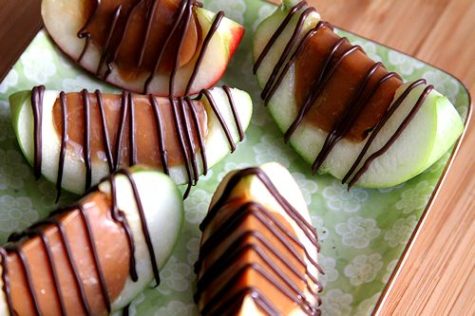
Our result:
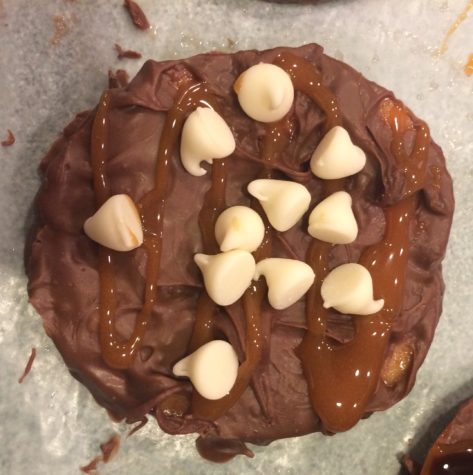
Reflection:
We followed these instructions word for word. First we washed the apples and used a mandolin to slice them into thin slices. Then we melted the chocolate and dipped the apple slices into the melted chocolate bowl. The chocolate didn’t completely stick to all of the apples so that was one of the more difficult parts. After the chocolate dried onto the apples, we drizzled caramel on them and we added white chocolate, milk chocolate, and butterscotch chips on top of the apples. Then we stuck the wood sticks into the apples, which destroyed some of the apples. Overall, it worked out pretty well. They may not look perfect but we think this was a success. We definitely recommend making this fall food!
Pumpkin Pie Twists – Recipe by Deliciously Sprinkled

Next, we decided to do a very well known fall favorite with a creative twist.. literally! These heavenly treats are called Pumpkin Pie Twists by Deliciously Sprinkled. This recipe has two parts. The dough requires:
- 1 can crescent rolls
- 1 cup pure pumpkin
- 3 tablespoons butter, melted
- 3 teaspoons pumpkin pie spice
The cream cheese icing requires:
- 1/1 cup unsalted butter, softened
- 1/4 cup cream cheese, softened
- 1 cup powdered sugar
- 1/2 teaspoon vanilla extract
Directions for dough, taken straight from Pinterest:
- Preheat oven to 375F degrees. Line baking sheet with parchment paper or silicon baking mat. Set aside.
- Unroll crescent dough and lay down as 4 rectangles on prepared baking sheet.
- Spread pumpkin onto 2 of the rectangles.
- Place the other 2 rectangles on top of the pumpkin. Press edges together.
- Brush melted butter on top of rectangles. Sprinkle with pumpkin pie spice.
- Using a pizza cutter, cut both rectangles into 6 strips.
- Twist each strip a few times and sprinkle with remaining pumpkin pie spice. Bake for 8-10 minutes.
Directions for Cream Cheese Icing, taken straight from Pinterest:
- In a large bowl, beat together the butter and cream cheese with an electric mixer. With the mixer on low speed, add the powdered sugar until smooth and creamy. Beat in the vanilla extract.
- Fill a zip-lock bag with cream cheese icing, lock it shut and snip off a corner of the bag. Ice tops of each pumpkin pie twist and enjoy. Simply throw the bag away when finished.
Our result:
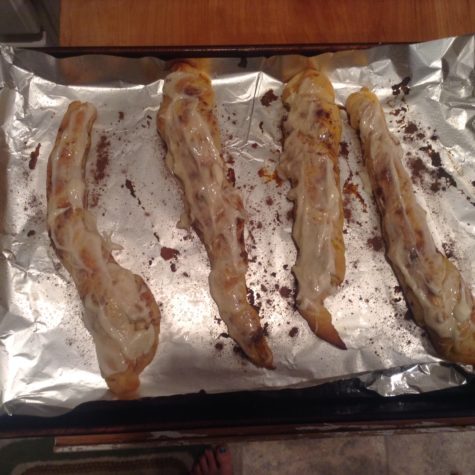
Reflection:
We followed these instructions, but didn’t have parchment paper, so we just used foil. But this did not affect the cooking process. The only thing we did not do is cut them into strips because we wanted them bigger and had limited time and space on the tray. They still tasted pretty good and we do recommend making these for your holiday festivities. You get the pumpkin pie taste without the hours put into making a whole pie.
Pumpkin Pie Bites – recipe by Sugar Apron
Do Pumpkin Pie Bites sounds intriguing? They’re not as difficult as someone would expect. The recipe requires Homemade All Butter Pie Crust or 2 pre-made, ready to roll pie crusts and the following ingredients:
- 1 (8oz) package cream cheese, softened to room temperature
- 1 cup pumpkin puree
- 1/2 cup sugar
- 2 eggs + 1 egg for egg wash
- 1 tsp vanilla
- 1 tsp pumpkin pie spice
- Whipped cream
Directions, taken straight from Pinterest:
- Preheat oven to 350 degrees.
- Grease and flour (or use nonstick cooking spray) a mini-muffin pan. Set aside.
- Roll the dough or pie crust out on a floured surface with a floured rolling pin.
- Using a round cookie or biscuit cutter (approximately 3 inches diameter) cut at least 24 rounds out ( or 12 rounds of each pie crust, if using store bought)
- Carefully press each round into the mini-muffin pan. Use your fingers to round the ends into a pie crust.
- Brush egg wash from one egg to the top edges of each pie.
- Using an electric mixer, beat the cream cheese and sugar until smooth. Add eggs one at a time, beating each until combined.
- Add pumpkin puree and beat to combine. Stir in vanilla and pumpkin pie spice.
- Spoon mixture into each mini pie crust almost up to the top.
- Bake for 15-20 minutes or until golden around the edges.
- Remove from oven and let cool on a cooling rack, or chill in the fridge for 30 minutes.
- Top with whipped cream and sprinkle with more pumpkin pie spice or cinnamon on top and before serving. Keep refrigerated.
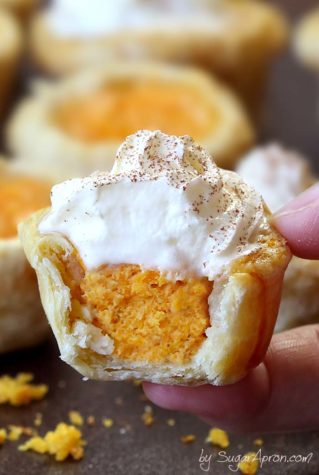
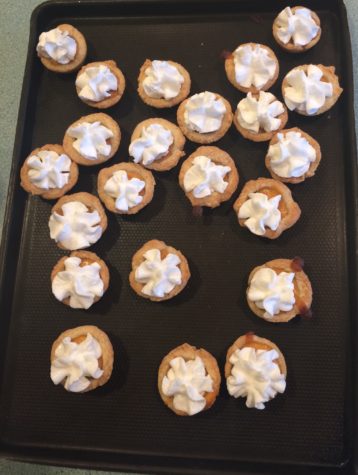
Our result:
Reflection:
These pumpkin pie bites are so simple if you just follow the directions! First, we used store bought pie crust and rolled it out flat. Then using cookie cutouts we cut out circles and put the them in the mini muffin pan. Then we mixed all the other ingredients together and put them inside the the pie crust. They baked perfectly and we topped them off with whip cream and sprinkles. Super easy and fun and we definitely recommend making them!
Inside Out Caramel Apples – recipe by Cup of Sugar Pinch of Salt
The final interesting treats we chose to make were inside out caramel apples. Instead of the generic caramel apples, this is an interesting and different way to make bite sized versions of them. This fall food makes the caramel on the inside in slices of apples instead of on the outside. The recipe requires:
- 3 large Granny Smith or Pink Lady apples,
- 1 large lemon, 2 cups brown sugar,
- 1/2 cup heavy cream,
- 2 tablespoons butter,
- 2 tablespoons light corn syrup (alternatively, maple syrup),
- 1 teaspoon vanilla extract,
- Chocolate sauce (optional)
Directions, taken straight from Pinterest:
- Cut your apples in half and use a melon baller to scoop out the insides, leaving the walls intact at about 1/2 to 1/4 inch thickness. Squeeze the juice from the lemon onto the apples and allow to set. This will keep them from turning brown right away.
- In a saucepan over high heat, combine the brown sugar, butter, heavy cream and corn syrup. Stir until the brown sugar has dissolved. Allow to boil, stirring occasionally, until it reaches 230F, about 7-10 minutes. Remove from heat and add the vanilla, stir continually until it stops bubbling. Allow to cool for about 10-15 minutes.
- Using a paper towel, wipe your apples down, removing the lemon juice as much as possible. If the inside of your apple is too wet, the caramel wont stick. Pour the caramel into the hollowed out apples until just below the top.
- Chill in the refrigerator until the caramel has set, about 20 minutes. Cut into slices** and drizzle with chocolate sauce if desired.
- These don’t do well out of the refrigerator for very long. If you must keep them at room temperature, you might consider lying them on their sides, on a piece of parchment or wax paper. They will likely separate somewhat, but still taste good!
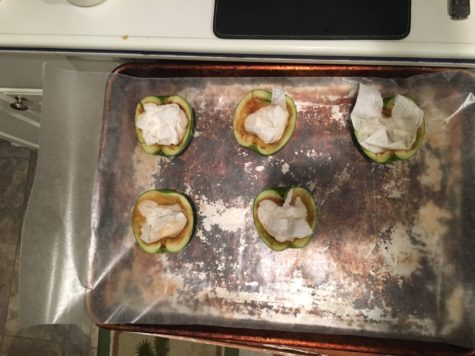
Our result:
Reflection:
We followed these instructions carefully and did everything the recipe said to do. We say with a heavy heart that although the caramel sauce was amazing, the apples browned very quickly and the caramel did not stick in the slightest. After freezing they were still very gooey and an absolute mess. On the other hand, a positive to this downer is that we were able to use the caramel sauce as a dip. So, we do say the sauce was a success, but the idea of the inside out caramel apple was not. We took a picture of the process but didn’t have a chance to take a picture of the finished product, but we’ll tell you it was not pretty. In fact, Kiley’s mom found them and threw them away instantly.
***
Overall, this was an extremely fun process. All of the fall foods, no matter the end result, were fun to make. The pumpkin pie bites by Sugar Apron were our favorites and we definitely recommend making this dessert out of all of the treats.